Sunday, February 20, 2011

A Neat Baby Shower Gift Idea!

I needed a quick, inexpensive gift for a baby shower recently, so I did what any "wait till the last minute" blogger would do. I scoured blogland for ideas for something quick and inexpensive, but absolutely too cute for words. And boy, did I get more ideas than I bargained for! But one in particular really spoke to me. It was a post about all different kinds of wreaths you can make using baby themed items. Now, I have made dozens of diaper cakes and I really enjoy doing them, but this time I wanted something a bit different. So I decided to try making one of these awesome wreaths. Since I make the diaper cakes frequently, I have a stash of baby items always on hand. I decided to raid my stash and see what I could come up with. I had an abundance of bath related items, so that became the theme for my wreath. I started with an old wreath form that half of the stuff had fallen off of and I knew I wasn't gonna be using it in it's original form, so I removed all the other stuff off of it and gave it a quick coat of white spray paint.


Then I gathered up some greenery and some flowers, all my baby bath items, some ribbon and my trusty glue gun.


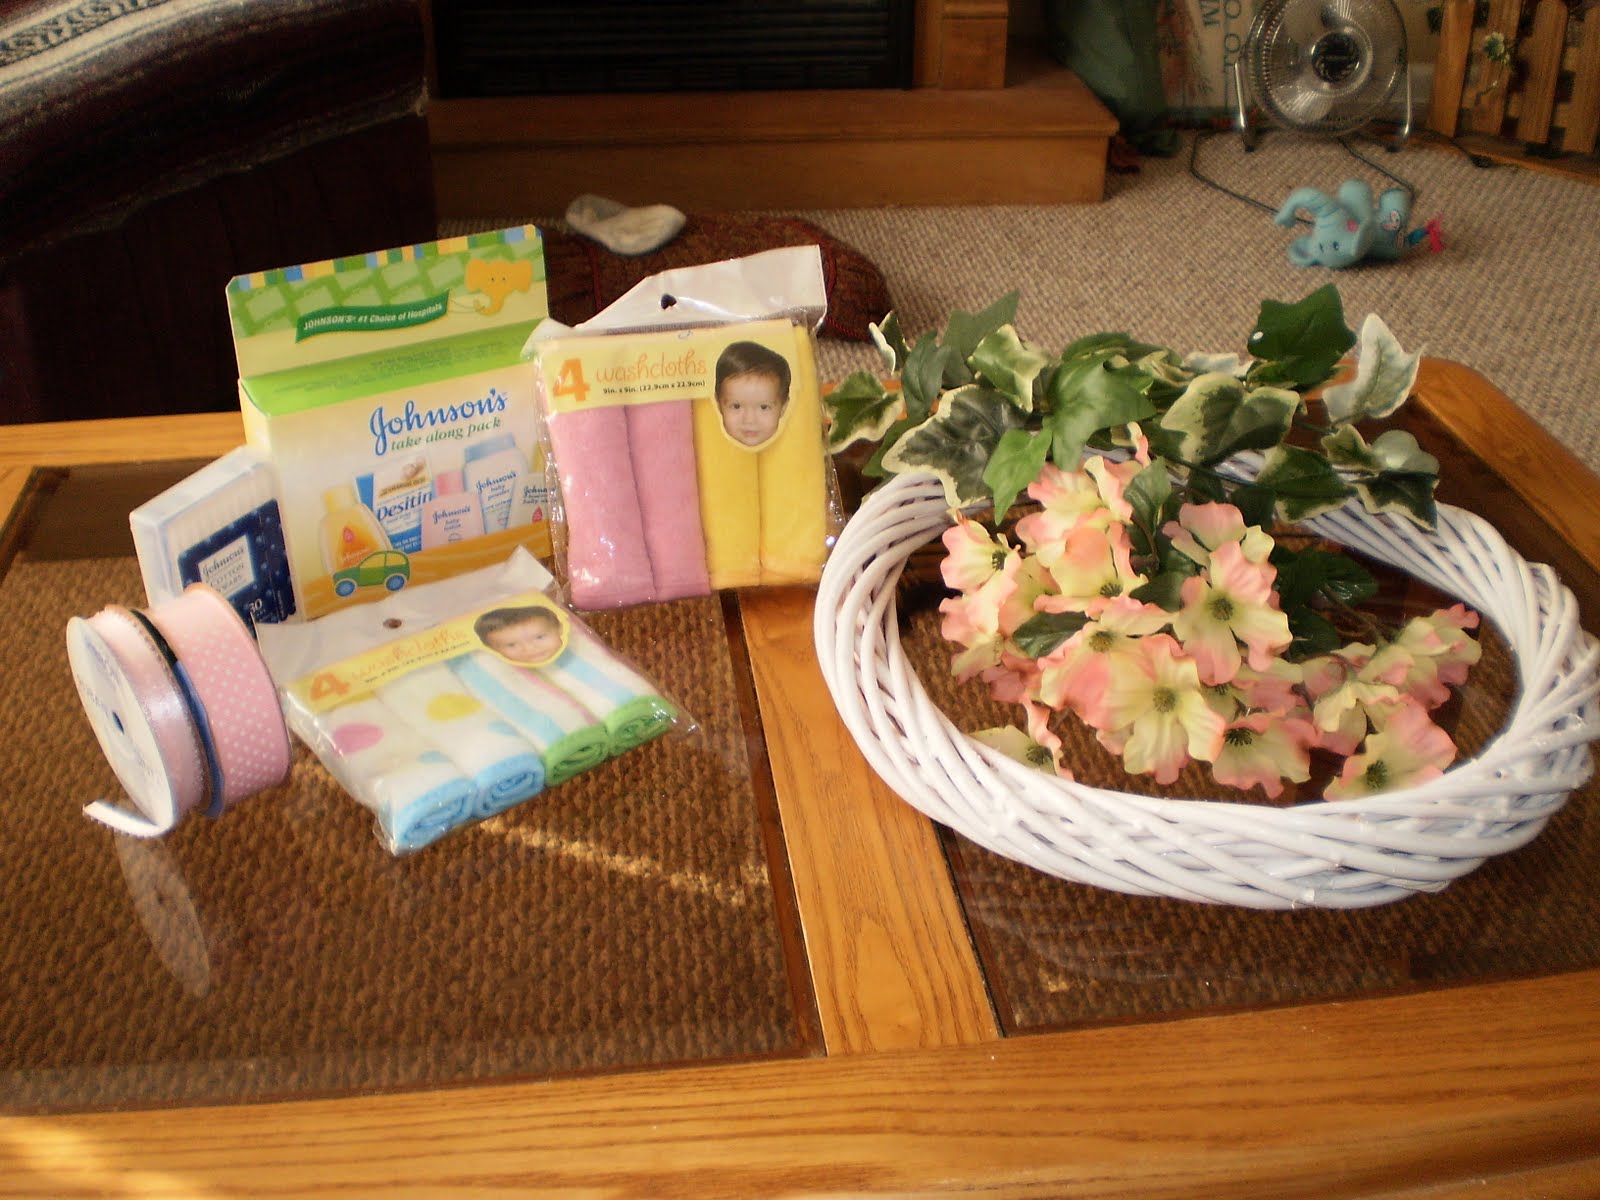
Then I got to work. All I did was tie my baby items onto the wreath with some pretty pink ribbon. I did use a spot of glue on the heavier items to make sure they would stay in place. Then I filled in any gaps with the greenery and flowers. Lastly, I glued a length of the wider ribbon to the top part of my wreath and tied a shoe lace bow out of more of the same ribbon and glued it on. The entire project took me about an hour to put together and since I already had all the supplies on hand, it was essentially free! I didn't have to run out on a Saturday morning frantically searching for a gift. That's always a good thing. Plus, this is a gift that is different from all the usual baby shower gifts and one that Mom and the new baby will remember and get a lot of use out of. I'm pleased with how it turned out.


You can click here to get more detailed instructions on how to put one of these cute wreaths together and to see all the other sweet wreaths this blogger has made. The ideas and possibilities for these wreaths are endless. I'm imagining one made for a new bride-to-be using kitchen gadgets or a bathroom themed one as a housewarming gift.

I'm linking up to these great parties this week. Please be sure to pop over and check out all the great ideas!


 http://linda-coastalcharm.blogspot.com/


Until next time. . .

Thursday, February 17, 2011

Stacking Boxes

I've been wanting to try my hand at painting some stacking boxes to go in my "new" kitchen (which I hope to get started transforming real soon!). So the last time I went to Hobby Lobby, I picked up two different sized plain boxes. I paid around $6 total for both boxes. I figured if I messed them up, I wouldn't be out too much money.


I decided to go bold and paint them red and black. I'm shooting for a French country sort of theme in my kitchen and my colors are going to be red and tan with touches of creamy white and black. I am also incorporating some roosters (of course!) and I love coffee so I will be using those two elements to help me decorate. I drew my rooster freehand and used stencils for the stars and the word COFFEE. Everything else was done freehand. I then distressed the boxes some for a worn look. I really like the way they turned out. Pretty decent for a first attempt, don't ya think??


I am thinking I will probably use these in a vignette on top of my fridge, but that is subject to change! I get so much inspiration from all you talented folks out there in blogland, so if anyone has any ideas on ways to display these boxes, let me know. I am working on a cute little display for an empty corner on my counter top right now. I found an awesome plate at Wal Mart of all places and I got it for $1.50 on clearance! I'm gonna pair it with a rooster and an apothecary jar filled with green apples. I'll show it to y'all when I get it just right.

I'm linking up to these fabulous parties. Please pop over and check them out!


Well, that's it for me today. I'm heading out the door for work. Thank goodness tomorrow is Friday! I hope everyone has a fantastic day and don't forget to count your blessings!

Till next time. . .

Wednesday, February 16, 2011

Tuesday, February 15, 2011

Ready for Spring!

I don't know about y'all, but I am so ready for spring to get here! I am not a big fan of winter, snow, or cold weather in general. With that thought in mind, I was browsing through a catalog I received in the mail that features lots of spring time items. I'm not sure how I ended up getting this catalog, as I've never ordered anything from them due to their rather high prices. They have some really nice things, just not in my budget right now! This little piece really caught my eye:


It is a set of 2 pictures featuring yellowed sheet music backgrounds with little bird's nests in the center. So cute! But at $39.99 plus shipping and handling for the pair, it's a bit pricey for me. So I set out to create a much more affordable version and here's what I came up with:


Please forgive the poor quality of the pictures. I really need a new camera! And, these photos were taken at night, so the lighting is not the greatest. I tried one with the flash on, and it was horrible. So this is the best I can do right now.

Anyways, my version only cost me around $5.00 to make! I bought an 8 X 10 plain wooden certificate frame from the Dollar Tree. I had the spray paint and the ribbon on hand from a previous project so that was free. I copied some sheet music I had on hand on some yellowed card stock. I already had this on hand as well. I found a set of two little bird's nests at Hobby Lobby for $2.99 and I purchased a package of mixed colored plastic bird's eggs at the same place for less than $2.


It was an easy project. I spray painted the frame and sanded it lightly to give it a somewhat worn look. Then I glued the sheet music to the cardboard backing that came with the frame. I cut a length of my ribbon and hot glued it to the front and back of the top of my frame. Then I glued three of my little eggs in the nest and hot glued the nest to the center of my sheet music. I then tied a bow out of another piece of ribbon and hot glued it to the top of my frame. That's it! I'm pleased with how this turned out and may make a smaller one so that I will have a set like the ones in the catalog.

I'm linking up with these great parties this week. Click on the image to go check out all the great things people are working on!


Photobucket


 http://linda-coastalcharm.blogspot.com/


Until next time. . .

Monday, February 14, 2011

Happy Valentine's Day!


Happy Valentine's Day! Kiss someone you love today!

Until next time. . .

Wednesday, February 9, 2011

Who is the Winner & What Do They Win????

I've left y'all in suspense long enough! It's time to show you what the lucky winner of my "Heart and Soul" giveaway is going to get! Remember, I told y'all that there would be something wooden, something soft, something stretchy and possibly even some chicken soup in addition to the big ole chocolate kiss?? Well, here's what the giveaway is:

~ a 7 ounce milk chocolate Hershey's kiss
~ a set of 3 wooden shelf blocks that say faith, hope, and love (handmade by me!)
~ a small "simplify" pillow (also handmade by me!)
~ a ribbon and button bookmark (this is the stretchy thing since it's made from a stretchy hair scrunchy! I made this as well!)
~ a set of four tile coasters (again, handmade by me!)
~ "A Taste of Chicken Soup to Inspire a Woman's Soul" book. (this is the chicken soup part of the giveaway ~~ clever, huh??!!!)


Now, for the part you've all been waiting for ~~ the winner!!!! I had 37 entries for this giveaway so I asked my hubby to pick a number from 1 to 37. Keep in mind that he has no imagination and he looked at me and said "37". Hhhhmmm. . . Well, o.k., that's what I get for expecting him to really take his time and think about this for a few minutes. I mean, really, this is a big deal and he just blurts out "37" without missing a beat!!! Men, can't live with 'em and it's against the law to shoot them! LOL! So that means that my winner is. . .

KAREN from KAREN'S KORNER!!!!!

Congrats to Karen! Send me your addy and I will get your goodies right out to ya! Thank you to all who entered this giveaway. I kind of liked it being a surprise, although I have to admit that I do tend to get more entries when I tell ya what I'm giving away. Oh well, variety is the spice of life, I suppose!

We are expecting a couple more inches of snow tonight so I am anxious about my daily commute tomorrow. If it gets too bad, hubby will take a vacation day and drive me to work. I kinda like that idea!! I hope wherever you are, that you are safe and warm!

Until next time. . .

Monday, February 7, 2011

I Won a Giveaway!!

I was the lucky winner of Carmen's recent giveaway over at Waxed Out Creative Life. My goodies arrived today and even before I got the box all the way opened, I could smell the yummyness!!!


Just look at all those wonderful goodies! Carmen made me a cute little chocolate stuffed primitive bunny! It has a tag around it's neck that says "Hoppy Easter"! He looks good enough to eat! Love it! She also sent me a nice little book entitled "Hanging Out the Wash". This is filled with stories regarding ways to find precious moments in every day. Slow down and take a breath!! Exactly what I need to do! Also included with the book was a cute card stock bookmark with "Take Time to Enjoy the Simple Things in Life". But what made the package smell so yummy was some of Carmen's homemade soap in apple cider and molasses scent and the most yummy smelling tarts I've ever smelled in ginger peach scent. Oh my, they are heavenly!! Carmen also enclosed a nice greeting card with a lovely note written inside. Thank you so much for everything, Carmen! I love it all and it made my day when I opened my mailbox and saw it there!

With Valentine's Day fast approaching, I wanted to share a couple of things I threw together this weekend. The first thing is a decoration. I bought a couple of those craft glass blocks at Hobby Lobby back before Christmas with the intent on doing something spectacular with it. Well, it sat in my "craft" room (spare bedroom) collecting dust. I went to the Dollar Tree last weekend and picked up a sheet of those Valentine window clings for my office window at work. I had a couple left over and so I decided to stick one on my craft block just to see how it looked. I liked it!! I had purchased a light to go inside of my block, so I put that in and tied me a bow out of some ribbon I had left over from Christmas and this is what I ended up with:


I am also planning on doing this with some St. Paddy's Day window clings and a green bow on top. Quick and simple, just the way I like it! It looks really cute in my office window at work and I got a lot of compliments on it today.

The next thing I did is gonna be for my son for Valentine's Day. He's 17 years old and thinks he's too old and big for Valentines. But he still likes candy every now and then so I decided to make him a candy ice cream sundae. I bought an ice cream sundae dish from Wal Mart along with a bag of Snicker's bite sized candy bars. I filled the sundae dish up with red hots, cut a 4 inch styrofoam ball in half and hot glued it to the top of the sundae dish. I then pinned on my candy bar bites until I had my ball covered. I tucked a few pieces of white tulle around to fill in any empty spots the candy didn't cover to mimic whipped topping. I also put a piece of tulle on top and stuck a cherry sucker down thru the top to mimic a cherry. Then I cut a flexible drinking straw in half at an angle and stuck it into the top. This picture doesn't do it justice, it's so cute in person!!


I think it would be cute to do one with chocolate covered raisins and cover the top with Hershey bars to simulate a chocolate milkshake! The possibilities are endless with this. I think I'll probably make my hubby one too. He loves chocolate almost as much as I do!

I'm linking up to these wonderful parties. Click on this image to go check out all the wonderful crafts, recipes and how-to's people are sharing!


Well, that's it for me today. I've got to get busy finishing up some items for my giveaway that ends Wednesday. If you haven't entered, hurry up and do so!!!

Until next time. . .

Friday, February 4, 2011

A Super Easy Any Holiday Craft


I have seen these cute little candy dishes all over blogland, so I decided to try my hand at making one. It was so easy, I've made three more!! Here's how I did it:


Supplies:
~ terra cotta pot
~ terra cotta pot tray
~ glass "fish bowl" dish (I got mine at the Dollar Tree)
~ wooden knob
~ craft paint in your choice of color
~ E6000 or gorilla glue
~ ribbon

Paint your pot, tray, and wooden knob. I chose white so that I could just change out my ribbon embellishment for different holidays or seasons. You can use whatever color you want. And you don't have to leave it just one color. Polka dots would be cute. Or stripes. Or stencils. Just use your imagination.

Once the paint is dry (I painted two coats, waiting about 10 minutes after I painted the first coat to do the second coat), turn the terra cotta tray over so that the bottom is now the top. Glue the wooden knob onto the center of the tray. This makes your lid for your bowl. Turn your terra cotta pot upside down and glue the glass bowl to the pot using E6000 or gorilla glue. I wouldn't recommend hot glue for this due to the weight of the pot and bowl. It would be a mess of broken glass and terra cotta if you picked up the glass and it came loose from the pot!!! Let this dry for at least 24 hours.

Now just fill it with your favorite candy, set your lid on top, tie on a sweet little bow, and voila, you have a cute bubble gum machine shaped candy dish. These make cute little birthday gifts for friends or co-workers as well.

Until next time. . .

Thursday, February 3, 2011

Time for a giveaway!!!

Wow!! I have only been blogging since December of 2009 so I'm sure you can imagine my surprise when I logged on this morning to see I'm at 326 followers!!! I believe that calls for a giveaway!!! I'm gonna call this one the "Heart & Soul" giveaway.

Now, I'm still putting this giveaway together, so you are only going to get a sneak peek of what is going to be offered. Here it is:


I am a true chocoholic so of course with Valentine's Day right around the corner, I have to include some chocolate in this giveaway! The rest of the goodies will have to remain a surprise! I will say, there will be something wood, something soft, something stretchy, and maybe even some chicken soup included in this giveaway! Have I piqued your interest yet???

Here's the rules:

~ This is for followers of my blog only. You guys are the reason for this giveaway so if you don't follow me, you can't play! If you aren't already a follower, sign up as I love new followers and welcome any and all. Leave me a comment on this post ONLY to let me know that you want to be entered. Comments on other posts won't be counted.

~ You don't have to post this on your sidebar or blog about it, but if you do, let me know and I will give you 2 extra entries. If you don't have a blog, please leave me an e-mail addy where I can contact you if you are the winner.

~ This is open only to my followers in the USA and Canada. Postage costs are just way too high for other countries. I'm sorry. :(

~ I will draw the winner for this giveaway on Wednesday, February 9th.

So, there ya go! Easy peasy! I've never done a surprise giveaway, so I hope y'all like what I am "cooking" up for you! I have enjoyed blogging and getting to know so many wonderful new friends since I began this journey. I hope to be able to continue doing this for a long, long time. I have learned so much from all you wonderfully talented folks! Your creativity never ceases to amaze me! Thank you for your loyalty to my ramblings, crafts, recipes, and gripping! I love and cherish you all!

Until next time. . .

Tuesday, February 1, 2011

Chalkboard Rooster

I finally got to finish my chalkboard rooster I showed y'all a while back. The weather here in Virginia has been horrendous these past few weeks and because of that, I haven't been able to get outside and get anything sanded or painted. We finally caught a small break in the weather this past weekend so I took advantage of it! I'm itching to get started on my ladder back chairs. I was gonna paint them black, but have decided to try a black stain instead. I'm hoping it will give me the look I want. I've already bought the stain, just waiting for a nice, sunny day with warmer temps to get it done!

Here's a before pic of my rooster. I looked at a picture in a magazine of a rooster that I liked, then drew it freehand on a piece of typing paper. Hubby traced it onto a piece of wood and cut it out for me. We drilled a small hole in the bottom and attached a wooden dowel which we then attached to another piece of wood for the base.


And here he is all painted up! I just love the way he turned out and can't wait to display him in my "new" kitchen when I get it finished. Lord, my life is such a work in process ~ always something to finish!!!


Now, let's eat!!


I'm linking up to these wonderful parties:


Until next time. . .